❓F.A.Q
Frequently Asked Questions
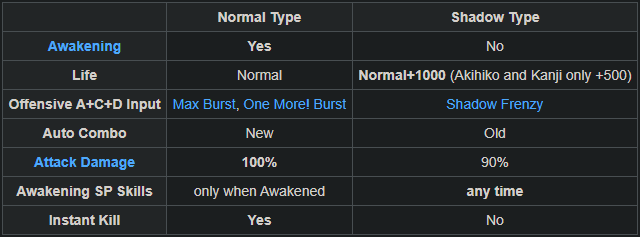
In terms of frame data and normal gameplay, both versions are identical. The only difference between the two is that Rise gets awakening health, while Shadow Rise gets +1000 base health, Shadow Frenzy, gains more meter, can use DDR at any time, and does 10% less damage. Here's a graph laying out general shadow differences:
Compared to other shadow characters, Shadow Rise doesn't get much from giving up awakening health and 10% base damage. One of the things that makes shadow characters so good is their ability to abuse minimum damage on their supers to deal massive amounts of damage, and their ability to use their awakening super without being at low health. With Shadow Rise not being able to link her supers in an efficient way and her generally lower damage than most of the cast outside of shadow burst, this makes the downsides of being Shadow shine brighter than the benefits. One of the only things Shadow Rise had in 1.1 was her ability to do explosive damage with DDR, and with 2.5 nerfs, DDR does minimal damage at best in combos.
Shadow Rise does have some perks however. When using DDR to end a shadow frenzy combo, she will recover burst gauge throughout the entire DDR animation, meaning that she will often come out of frenzy with some burst already recovered. DDR frenzy combos are usually best done in low meter situations where the higher damage options are out of reach, meaning she can do respectable frenzy damage for low meter usage. Another thing that is actually okay for Shadow Rise is her meter gain. With increased meter gain for being a shadow, she can afford to spend meter on pressure more often. She also has access to neutral frenzies in the corner that she can access while doing her corner bnb.
While shadow does have some perks, the benefits of playing regular far outshine that of playing shadow in my opinion.
You should primarily be saving meter for:
Damage
Pressure
In most cases, meter will be used to lock the opponent down, close out rounds, or reduce the amount of awakening health an opponent will get on entering awakening. There are applications for meter with corner carry combos, but these situations are, in most cases, not worth it compared to how you could be spending it for pressure.
To summarize, use meter for damage and pressure, and when the situation calls for it, for corner carry.
Some matchups are easier to set these tools up in than others. For slow pressure tools like scan or arrow rain, you will primarily want to use them at fullscreen if you are using them in neutral. This minimizes the risk of your opponent running up to you in time to punish. Ideally you want to set up while the opponent is too preoccupied to think about punishing. A handy way of doing this is by making them block a j.5C and setting up a j.5D or j.2D on your descent. (They can still punish, but if you hit j.C far enough the window to punish is much smaller)
This is harder to do in matchups where the opponent can punish these tools fullscreen. Make sure to adapt your pressure to the matchup whenever you think of setting up.
Rise has a few quirks to her gameplay that may be a bit unconventional to some players. As mentioned in the Synopses, she is a meld between a zoner, a rushdown, and a setplay character. Knowing when to set up the right tools at the right times is a big hurdle that new Rise players will have to overcome when they pick her up. However, her base gameplay is not too hard to learn, and her combos are not thumb-breakingly difficult. She is a fairly beginner-friendly character to get into, but some difficulty can be felt when trying to master her toolkit.
Unfortunately, in 1.1 and 2.5 you cannot just run up to your opponent and DDR them to death. Even the 'unblockable setups' often have ways that opponents can escape, meaning that truly unblockable setups for this move are very few in number, and have very specific requirements both on the Rise player's part and the opponent's part. Do not learn Rise with the assumption that you will be using this move very often. With the 2.5 nerfs to its damage and startup, its viability in your usual confirm is questionable, as in most cases you will need to spend additional meter for SB moves to link into it in a combo. This super does damage that is comparable to damage in combos that use less resources. It is your choice to use this move, and you will have to live with the consequences as well.
That being said, this super does have some application in resource dump combos, and can still do explosive damage if used correctly. Be sure that you want to use it before you throw one out.
Last updated